 |
I first saw this idea in a magazine about 5 years ago and jotted down some notes in my craft scrapbook.
I came across it again a few weeks ago when I was looking for ideas for the handmade Christmas challenge and fell in love with it all over again.
My weakness is dishes, especially pretty dishes and this craft is just the thing to put some of my pretty tea cups to use. I collect them from op shops and garage sales and markets, some I've been given as gifts. I love them all, and I use them all (often at our tea parties, I love a crazy tea set), they are not just for decoration or catching dust.
I made one of these candles to test the instructions, and then I made another one for the bathroom. And another one for our second bathroom. Then seeing as I was on a roll I made some for my bedroom and three for Hannah's new room - one for her dressing table, one for her shelving unit and one for her bedside table. They are so pretty.
If you have someone who loves pretty things and candles, these teacup candles will be sure to delight and they are quick and easy to make, I used old candle ends that were sitting in the dresser drawer and they cost just a few cents each!
You will need:
An old bone china tea cup (saucer optional)
A small saucepan
A clean, empty fruit tin (or similar size)
Old candle ends
Candle wicking (from craft shops)
Wick sustainers (from craft shops
Tongs
Wooden skewers
Step 1. Put some water in the saucepan and bring it to the boil. Turn the heat down.
Step 2. Break up the candle ends and put them in the tuna tin. Using your tongs sit the tuna tin in the boiling water. Let the candles melt (you can give them a gentle stir with a skewer to help the process along.
Step 3. Cut a piece of wicking to the cup's height plus 5cm. Clamp one end to a wick sustainer; tie the other end around a skewer. Dip wicking and sustainer into melted wax to coat them. Remove and stick the sustainer to cup's bottom.
Step 4. Pour in the wax, stopping 1cm below the cup's rim. Allow the wax to set, it takes about 1 hour. The candle will harden with a well in the centre. To even it out, use another skewer to prick a circle of holes about 3mm deep around the wick. Pour in melted wax until surface is 6mm below rim. Trim the wick so that it sits just above the candle wax.
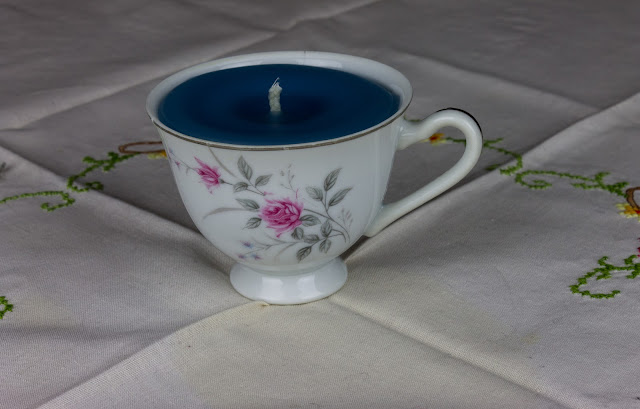
I used white candles and had just one half a red candle left from Christmas that I melted into the white wax. It became a really soft pink and I was so pleased - don't you think it's the perfect colour for showing off the tea cups?
Try not to mix colours (red with purple and green) or you may well end up with a dirty, mud coloured candle - it will work, it just won't be as pretty.
If you like scented candles add a few drops of your favourite essential oil (I used lavender because they're going into our bedrooms and it's so relaxing). Think about where the candle will be used and choose a fragrance to suit the room to make it an extra special gift.
And just as a little "insurance" I sat the tea cups I put on our dressing tables in their saucers - I'd hate to get a heat ring on the furniture. You don't *need* to put the cups in saucers, they look cute just as they are, but if you have the saucer, or one in the same colours even if it is a different pattern, they look great too.
I saw Christmas mugs today (can you believe it? The 8th July and they were putting out Christmas stuff, Woolworths already have puddings and mince tarts on sale!), very cute in green and red - they'd be lovely with a red or green candle as a table decoration - if you're taking part in the handmade Christmas challenge, it's an idea that won't break the bank or send you crazy with lots of fiddly steps.
Ok, my photos didn't turn out :( We made another candle this morning, using some blue candles and it looks OK, but the pale pink was so pretty that I think I'll buy a red candle just to mix with all the white stubs.


.jpg)


No comments:
Post a Comment
Thanks so much for taking the time to leave a comment...I just love hearing from you!
Just a couple of things:
Please don't use your comments to advertise your business or goods for sale, any such comments will be removed.
And please include your name, ANONYMOUS POSTS WILL NOT BE PUBLISHED AND WILL BE RECORDED AS SPAM.